Using the Track Inspector
In the Inspector  , select the Track tab to view and edit settings for the selected track.
Click a track's header to select it, and the Track tab is displayed automatically if the Inspector is visible: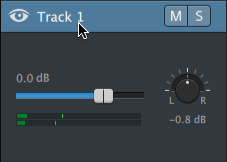
Summary
Type a value in the Name box to set the name of the selected track. The name you type here will be displayed in the track header:
When Ripple is first enabled, ripple edits are enabled for all tracks. If you want to turn ripple editing on or off for a track, use the Ripple sync switch.
The Ripple sync switch is available only when the Ripple button  above the timeline is enabled.
Audio Output
Each track in your project supports two audio channels, and each clip in your project supports multichannel audio. For more information, see "Working with multichannel audio."
The Audio Output controls in the Track Inspector allow you to adjust the overall level of the track and control each channel's contribution to the stereo track.
|
Item |
Description |
|---|---|
|
Click the value and type a new value or drag the fader adjust the overall volume of the selected track. Double-click the center of the thumb to reset the fader.
Dragging the Volume fader in the Track Inspector also adjusts the Volume fader on the track header. For more information, see "Adjusting track controls." Hold Ctrl (Windows) or ⌘ (macOS) to adjust the volume fader in fine increments. When adjusting volume, remember to watch your audio meters. Because you are adding the volumes of all of the tracks together, it is easy to clip the audio output. Make sure that the meters never display the red Clip indication during playback. For more information, see "Monitoring audio levels." The meter in the Track Inspector shows audio levels for the selected track. The meter in the activity pane at the top of the Catalyst Edit window shows the sum of all audio at the cursor position. |
|
|
Drag the knob to control the position of the track in the stereo field: dragging to the down or to the left will place the audio in the left speaker more than the right, and dragging up or to the right will place the audio in the right speaker. Double-click the knob to reset panning to the center. Dragging the Pan knob in the Track Inspector also adjusts the Pan knob on the track header. The Track pan knob is not displayed for tracks that are assigned to a mono output or that contain multichannel clips. When a track contains multichannel clips, use the Audio Channel controls to pan each channel. |
|
|
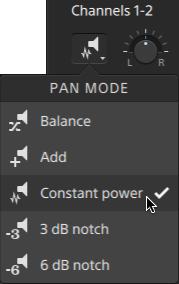
Click the Pan mode button and choose a setting from the menu to choose the panning model that is used for the track:
For example, when using the 3 dB notch or 6 dB notch settings, when you pan fully right, the right channel is played at 0 dB and the left channel is not audible. As you pan to the center, each channel is attenuated to the specified center value (-3 dB or -6 dB). As you pan to the left, the left channel is played at 0 dB, and the right channel is not audible. |
|
|
Click When a track is muted, it is excluded from the audio mix. You can enable the Clicking the Mute button in the Track Inspector also updates the Mute button on the track header. |
|
|
Click When a track is soloed, all unsoloed tracks are effectively muted. Click the Clicking the Solo button in the Track Inspector also updates the Solo button on the track header. |
|
|
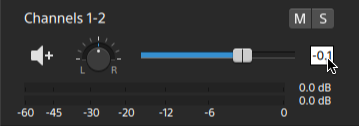
The following controls are displayed only when a track contains multichannel clips. For more information, see "Working with multichannel audio," |
|
|
Drag the fader to adjust the volume of the selected channel. Double-click the center of the thumb to reset the fader. You can double-click the numeric value to type a new value:
Dragging the Volume fader in the Track Inspector also adjusts the Volume fader on the track header. For more information, see "Adjusting track controls." Hold Ctrl (Windows) or ⌘ (macOS) to adjust the volume fader in fine increments. When adjusting volume, remember to watch your audio meters. Because you are adding the volumes of all of the tracks together, it is easy to clip the audio output. Make sure that the meters never display the red Clip indication during playback. For more information, see "Monitoring audio levels." The meter in the Track Inspector shows audio levels for the selected channel. The meter in the activity pane at the top of the Catalyst Edit window shows the sum of all audio at the cursor position. |
|
|
Channel pan |
Drag the knob to control the position of the channel in the stereo field: dragging to the down or to the left will place the audio in the left speaker more than the right, and dragging up or to the right will place the audio in the right speaker. Double-click the knob to reset panning to the center. Dragging the Pan knob in the Track Inspector also adjusts the Pan knob on the track header. The Channel pan knob is not displayed for channels that are assigned to a mono output. |
|
Click the Pan mode button and choose a setting from the menu to choose the panning model that is used for the channel:
Please see "Pan mode" for descriptions of the available pan modes. |
|
|
Click When a channel is muted, it is excluded from the audio mix. You can enable the Clicking the Mute button in the Track Inspector also updates the Mute button on the track header. |
|
|
Click When a channel is soloed, all unsoloed channels are effectively muted. Click the Clicking the Solo button in the Track Inspector also updates the Solo button on the track header. |
|
 to mute/unmute the selected track.
 to solo/unsolo the selected track.
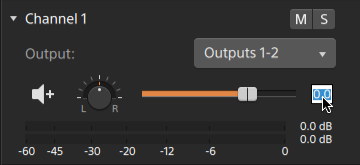
Video Effects
When the selected track has effects applied to it, you can use the Video Effects controls to control the settings for each effect. For more information, see "Adding effects to a track."
Click the Overlay button  to show or hide a plug-in's interactive overlay controls in the video preview (when available).
Click the Mute button  to bypass a plug-in without removing it from the chain.
Click the Delete button  to remove a plug-in from the chain.
Drag a plug-in's heading to change its position in the plug-in chain.
Click the toggle arrow to show or hide each plug-in's controls.
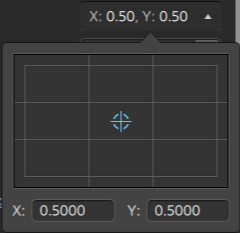
When you select a position parameter in the Inspector, a control point ( ) is displayed in the video preview. You can adjust the parameter's position by dragging the control point in the video preview or the Inspector:

|
|