Previewing video
When you double-click a file in Organize mode, the file is loaded in Edit mode, where you can preview the file, log mark in and mark out points, and apply color correction. For more information about using Organize mode, please see "Organizing media in a library."
You can also choose to display the video preview in a secondary window that you can position anywhere on your screen or on a secondary display. For more information, see "Editing Catalyst Prepare options."
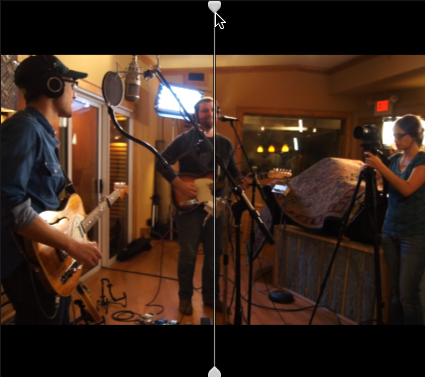
If you have multiple clips selected in the Media Browser on the left side of the window, the selected clips will play sequentially in the order they are displayed. The file name of the current file will be displayed above the video preview, and a vertical line in the timeline indicates where each selected clip begins:

If the current clip contains discontinuous timecode, an indicator is displayed in the timeline to identify the discontinuity:
A  indicates a clip from an Optical Disc Archive volume.
An ![]() on a thumbnail indicates that a clip spans multiple discs on an Optical Disc Archive volume. When you play a clip that spans discs, an indicator is displayed in the timeline to identify the point where the clip switches discs:
on a thumbnail indicates that a clip spans multiple discs on an Optical Disc Archive volume. When you play a clip that spans discs, an indicator is displayed in the timeline to identify the point where the clip switches discs:
Enable the Preview using proxy clips switch in Options if you want to use proxy clips for playback if they are available. During playback, a Proxy indicator is displayed above the video preview. For more information, see "Editing Catalyst Prepare options."
Click the Play  button to start playing the current video. Playback will start from the playback position indicator and continue until the Mark Out position or the end of the file.
You can click the trackbar below the transport controls to set the play position indicator:

You can use the shuttle control on the transport toolbar to seek forward or backward or adjust the playback speed. For more information, see "Navigating the timeline."
For information about flipping and rotating video, enabling anamorphic desqueezing, and displaying safe zone and mask guides, please see "Editing clip settings."
Changing the preview mode
When you're adjusting color correction, you can change the preview mode to allow you to compare adjusted clips to the original source. For more information, see "Editing Color Adjustments controls."
Click the Preview button in the top-right corner of the video preview to choose a preview mode. Split-screen previews allow you to split the video preview and waveform/histogram/vectorscope monitor so you can see your affected and unaffected video at the same time.

 Before: full-frame video is displayed in its original state.
 After: full-frame video is displayed in its color-corrected state.
 Split: a single frame is displayed in a split-screen view with the original video on the left and the color-corrected video on the right.
If you want to move the split location, hover over the preview frame. When the split point is displayed, you can drag the handles at the top of bottom of the screen to adjust where the preview is split:
 2 Up: two full frames are displayed in a split-screen view with the original video on the left and the color-corrected video on the right.
Scaling the video preview
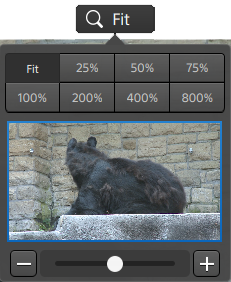
Click the magnifying glass to adjust the size of the video preview.
-
Click Fit to scale the video to fill the Video pane.
-
Click a preset to scale the video to a predefined magnification level.
When the level is below 100%, you can drag the blue rectangle to pan and adjust the visible portion of the frame.
-
Drag the slider or click the
 and
and  buttons to choose a custom zoom level.
 -
Click the thumbnail and roll your mouse wheel to zoom in or out.
Toggling full-screen playback
Click  to display the Video pane in full-screen mode. Press Esc or click the Close button to exit full-screen mode.
Adjusting playback settings
Click the Playback Settings button to the left of the transport controls to display the Playback Settings controls.
Speed/Quality
Select Speed if you want decoding to be optimized to preserve the frame rate.
Select Quality if you want decoding to be optimized to preserve video quality.
When using a device other than your CPU, high-quality deinterlacing and upscaling are applied to convert SD and HD sources to modern progressive HD and UHD assets.
-
High-quality deinterlacing is applied to interlaced source media when playback is paused, during transcoding, and during playback when the Playback Settings Speed/Quality setting is set to Quality.
-
Please note that some systems with limited GPU memory are not supported.
Real Time/All Frames
Select Real Time if you want to play the clip using its source frame rate. Audio is played at its recorded rate, and video frames are skipped if necessary to preserve the playback rate.
Select All Frames if you want to ensure that all video frames are played. The frame rate may be reduced if needed to ensure all frames are played. Audio is unavailable in this mode.
If XAVC S and XAVC HS playback is not smooth, we recommend using the All Frames playback setting.
-
Real Time/Speed:

-
Real Time/Quality:

-
All Frames/Speed:

-
All Frames/Quality:

Using the transport controls
The transport controls below the video preview allow you to control playback:
| Button | Description | |
|---|---|---|
|
|
Moves the playback position indicator to the Mark In position. Click again to move to the beginning of the selected file. |
|
|
|
Moves the playback position indicator one frame or field to the left. |
|
|
|
Playback will start from the playback position indicator and continue until the |
|
|
|
Moves the playback position indicator one frame or field to the right. |
|
|
|
Moves the playback position indicator to the Mark Out position. Click again to move to the end of the selected file. |
|
|
|
Plays only the area between the Mark In and Mark Out points in a continuous mode. For more information, see "Marking in and out points for playback." |
|


