Nested timelines
Nesting allows you to add a Catalyst Edit subordinate timeline to another project. Nesting can help you organize a timeline or create other effects:
-
Create a single element — such as a lower-third graphic or watermark — that you can use in multiple timeline locations or projects.
-
Create a complex composited element that you can use as a single media object in the timeline.
-
Create a separate timeline for each scene in a video and nest those timelines in a master video project.
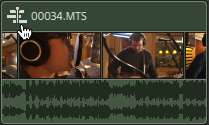
Clips with nested timelines are displayed in green:
Creating a nested timeline
-
Select the clips you want to include in your nested timeline. The selection must contain a contiguous range of clips (no spaces between clips). For more information, see "Selecting clips and positioning the cursor."
-
Click the Clip button
 below the timeline and choose Create nested timeline from the menu. The selected clip starts at the 00:00:00;00 position in the new nested timeline.
 You can edit the new nested timeline as you would any other project, adding tracks and clips as needed.
When you need to return to the parent timeline, use the breadcrumb trail at the top-left corner of the timeline.
If clips contain automation envelopes before you create a nested timeline, the clip automation envelopes are available in the clips in the nested timeline. The parent clip will use the default single-point envelope. For more information, see "Clip volume automation."
You can create a nested timeline from a Catalyst Prepare storyboard (
 ) or a Catalyst Browse clip list by adding the storyboard/clip list to the Catalyst Edit timeline. For more information about using media from a Catalyst Prepare library (
 ), see "Finding media."
Opening a nested timeline
-
Select a clip that contains a nested timeline. For more information, see "Selecting clips and positioning the cursor."
-
Click the Clip button
below the timeline and choose Open nested timeline from the menu or click the clip icon in the clip header.
The selected timeline is opened.
The cursor position is maintained when you navigate into or out of a nested timeline.
You can edit the new nested timeline as you would any other project, adding tracks and clips as needed.
When you need to return to the parent timeline, use the breadcrumb trail at the top-left corner of the timeline.