Adding title clips

You can add title clips to your project to create titles and credits.


Adding a title clip

  1. Click to select a track.

  2. Click to position the cursor where you want to add the title clip.

  3. Click the Add button below the timeline and choose Title. The clip is created at the cursor position on the timeline.

    You can also drag the Title generator from the Plug-Ins pane to the timeline to create a title clip.

  4. Use the controls in the Clip Inspector to adjust the generator's settings.

Editing a title clip

  1. Select the clip you want to edit.

  2. Click the Inspector button to show the Inspector pane.

  3. In the Inspector, select the Clip tab to view and edit settings for the selected title clip.

    For more information, see "Using the Clip Inspector."

    Item

    Description

    Text

    Type in the edit box to set the text that will be displayed by your clip.

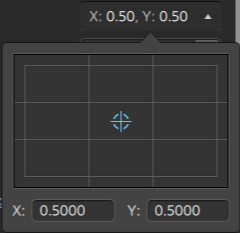
    Position

    The drop-down list displays the current position of the text in the frame. Click to display an edit control you can use to position your text.

    You can drag the point in the edit control or type values in the X and Y boxes to set the position of your text in the frame. Double-click the point to reset it.

    Hold Ctrl (Windows) or ⌘ (macOS) to adjust the point in fine increments.

    Size

    Type a value in the box or drag the slider to adjust the size of the text.

    Hold Ctrl (Windows) or ⌘ (macOS) to adjust the slider in fine increments.

    You can drag the slider past the end of the trackbar to unlock the full range of the control. When the value is set outside the range of the slider, the handle will be displayed as or .

    Font

    Choose a font from the drop-down list to set the typeface that will be used for your text.

    Bold

    Click to toggle boldface text for the selected clip.

    Italic

    Click to toggle italicized text for the selected clip.

    Color

    Click the color sample to display a color picker, where you can choose a color or type color values to set the text color. You can also adjust the transparency (alpha value) of the text.

    Rotation

    Type a value in the box or drag the slider to adjust the angle of the text in the frame.

    Alignment

    Horizontal

    Choose a setting from the drop-down list to indicate how your text is aligned within the text box and how the text box is aligned with the point specified by the Position value:

    • Select Left to left justify the text in the box and align the left edge of the text box with the Position point.

    • Select Center to center justify the text in the box and align the center of the text box with the Position point.

    • Select Right to right justify the text in the box and align the right edge of the text box with the Position point.

    Vertical

    Choose a setting from the drop-down list to indicate how your text box is aligned with the point specified by the Position value:

    • Select Top to align the top of the text box with the Position point.

    • Select Center to align the center of the text box with the Position point.

    • Select Baseline when you have a single line of text and want to align the text's baseline with the Position point.

    • Select Bottom to align the bottom of the text box with the Position point.

    Background

    Color

    Click the color sample to display a color picker, where you can choose a color or type color values to adjust the background. You can also adjust the transparency (alpha value) of the background.

    Adding a background color makes it easy to create a lower-third color box.

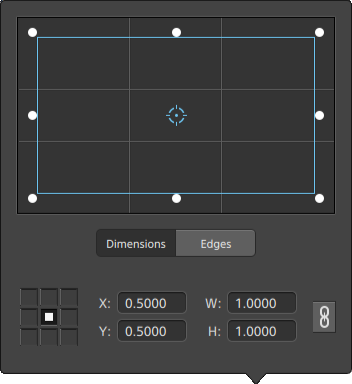
    Location

    The drop-down list displays the current position of the text background in the frame. Click to display an edit control you can use to set the position of each corner of the background in the frame.
    -

    Adjusting box position

    Drag the point in the edit control to set the position of the background in the frame. Double-click the point to reset it.

    When you type values in the Dimensions tab, you can set an anchor point and specify the position of the box using X/Y coordinates. For example, click the top-right corner of the anchor control and use the coordinates 0.5000, 0.5000 to move the top-right corner of the box to the center of the control.

    Adjusting box dimensions

    You can drag the corners of the rectangle in the edit control or type values in the W and H edit boxes to set the size of the frame.

    When you type values in the Dimensions tab, you can set the size of the box using W/H dimensions. Click the Lock button to preserve the aspect ratio of the box so changing the width or height will automatically update the other value,

    Adjusting box edges

    You can drag the edges of the rectangle in the edit control or type values in the Edges tab to specify the position for each edge of the box.

    Drag a corner of the rectangle to preserve aspect ratio while resizing.

    Hold Shift while dragging the corners of the rectangle to resize and adjust aspect ratio.

    Hold Alt (Windows) or Option (macOS) to resize the rectangle from the center.

    Hold Ctrl (Windows) or ⌘ (macOS) to adjust the controls in fine increments.

    When a corner is selected, you can use the arrow keys to adjust the selected corner, or press Ctrl (Windows) or ⌘ (macOS) + the arrow keys to adjust in fine increments.

    Drag the edges of the rectangle to resize the rectangle.

    Drag an edge of the rectangle to preserve aspect ratio while resizing.

    Hold Shift while dragging an edge to resize and adjust aspect ratio.

    Hold Alt (Windows) or Option (macOS) to resize the rectangle from the center.

    Hold Ctrl (Windows) or ⌘ (macOS) to adjust the controls in fine increments.

    Drag the center of the rectangle to move without resizing, or double-click the point to reset it.

    Hold Shift while dragging to constrain to horizontal/vertical/45-degree movement.

    Hold Ctrl (Windows) or ⌘ (macOS) to adjust the controls in fine increments.

    When the rectangle is selected, you can copy the position of the rectangle to paste to another clip.

    Shadow

    Enable

    Click to toggle a shadow behind your text.

    Color

    Click the color sample to display a color picker, where you can choose a color or type color values to set the shadow color. You can also adjust the transparency (alpha value) of the shadow.

    Feather

    Type a value in the box or drag the slider to blend the shadow with the background.

    Hold Ctrl (Windows) or ⌘ (macOS) to adjust the slider in fine increments.

    Offset X/Y

    Type a value in the box or drag the slider to offset the shadow from the center of your text.

    Hold Ctrl (Windows) or ⌘ (macOS) to adjust the slider in fine increments.

    Outline

    Enable

    Click to toggle an outline around your text.

    Color

    Click the color sample to display a color picker, where you can choose a color or type color values to set the outline color. You can also adjust the transparency (alpha value) of the outline.

    Thickness

    Type a value in the box or drag the slider to adjust the thickness of the text outline.

    Hold Ctrl (Windows) or ⌘ (macOS) to adjust the slider in fine increments.